
Photographing the Milky Way
I have always liked astronomy. In fact, my interest in photography and astronomy go hand in hand. When I a senior in high school I took a science class that was half the year photography and half the year astronomy. That class changed my life. I stayed in touch with my high school teacher until he passed away several years ago.
I dabbled in night photography a bit in the film days, and I have been to three total solar eclipses and one annular solar eclipse in my lifetime. But digital cameras and new software techniques have raised astrophotography and astro landscape photography to new heights (pun intended).
In the recent past I was content on taking my star images in a single exposure, capturing the landscape and stars in one 30 sec or less exposure. You may have heard of the “500 Rule” where you divide the focal length of your lens into 500 and that will tell you how long you can expose without getting star movement (and that was usually a little too generous). That means you were limited in your exposure time, by the focal length of your lens. This required high ISO’s in order to capture enough light see the stars and the Milky Way. Typical exposures were around 25 sec and ISO 3200. And I photographed that way for years and made some nice images. Unfortunately, these images always tended to be noise and not to have a lot of color in the stars. I would see other people’s images that showed much more detail in the sky and Milky Way and I always wanted more.
So, I started researching ways to get better night sky images. And I discovered two methods of getting better images. One method is image stacking, where you take multiple images of the night sky and combine the images to get more light, more detail and more color in your images. For these images, you use very high ISO’s and shorter exposures and you can get pinpoint stars and the stacking of the images removes the noise from your pictures. For example, with my Tamron 15-30mm G2 lens I can shoot at 6 seconds per exposure and an ISO of 20,000 and take 15-20 images and I get more than 20x the amount of light captured. The image stacking software is easy to use and the amount of detail I am getting is amazing!
The second method of capturing more light requires the use of a star tracker. This is a device that rotates your camera at the same speed the earth rotates, so the stars stay in the same place in the frame of your camera over an extended time. This is a little trickier to do then the stacking method because you need the star tracker, the tracker has to be aligned to the North Star and there are a lot more moving parts to get just right. But with this method you can take 3-5 minute exposures of the sky at low ISO’s in the 400-640 range an capture great detail in the sky. Of course, if your camera is moving during exposure than your foreground becomes a blur, so you have to shoot a second image of your foreground using a similar shutter speed, aperture, ISO combination and combine the two images in post processing.
Here are a couple examples of each:
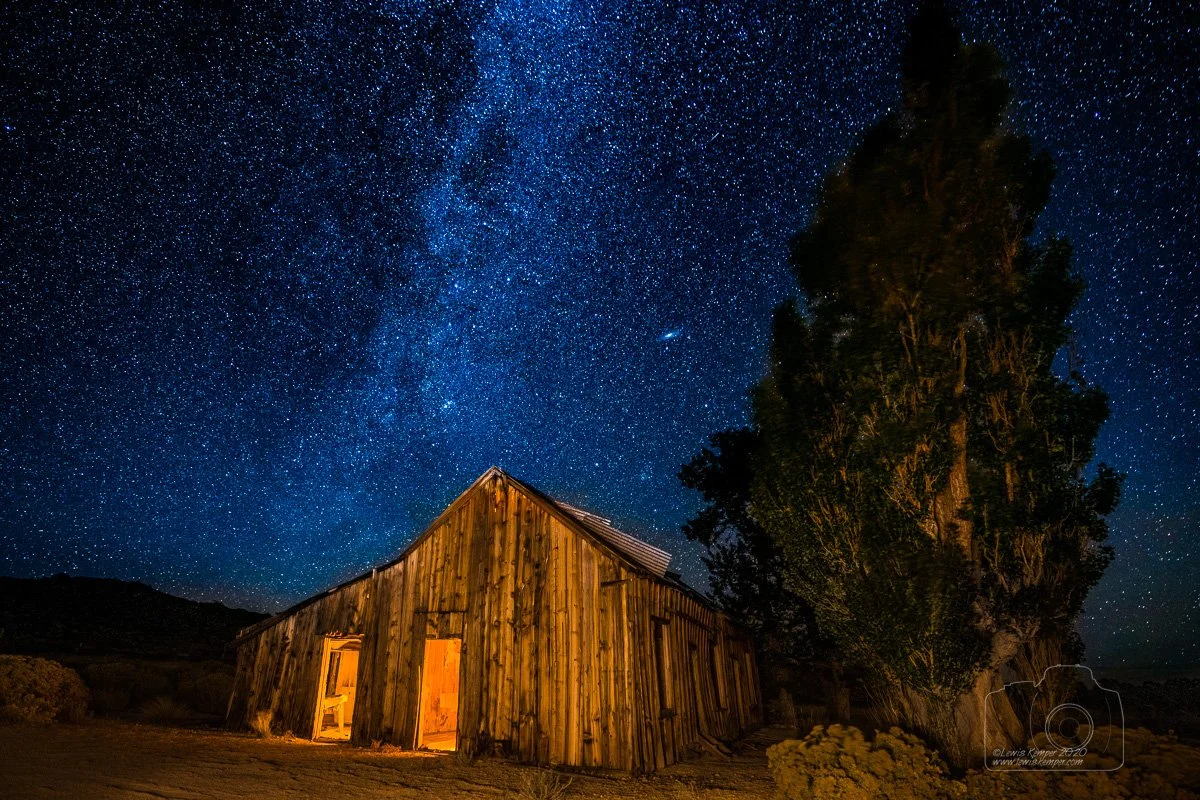
Single exposure 25 sec; f/2.8; 15mm; ISO 2500; Nikon D850; Tamron 15-30mm G2

Single exposure; 25 sec; f/2.8; ISO 2500; 19mm; Nikon D850; Tamron 15-30mm G2

Stacked Images: Sky - 19 images stacked in Starry Landscape Stacker; 6 sec; f/3.2; ISO 20,000; 15mm; Nikon D850; Tamron 15-30mm G2

Stacked Images: Stars - 12 images stacked in Starry Landscape Stacker; 6 sec; f/3.2; ISO 20,000; 15mm; Nikon D850; Tamron 15-30 G2
and combined with Foreground 179 sec; f/3.2; ISO 400; 15mm; Nikon D850; Tamron 15-30 G2

Tracked Image – Sky – 318 sec; f/3.2; ISO 400; 24mm; Nikon D850; Tamron 15-30 G2
Foreground Tracker Off - 318 sec; f/3.2; ISO 400; 24mm; Nikon D850; Tamron 15-30 G2
I have tried both of these methods and have had good success both ways and a few challenges with the star tracker. I am hoping that when the Polaris smart tripod head comes out this later this year, that it will take away some of the challenges I have had with the tracker and make that whole process easier. But I am learning each time out and the tracker is getting easier to use.
I am working on a new training video to share what I have learned, but it probably won’t be ready until the end of summer. Meanwhile I am planning to do a webinar session on the topic sometime in July, I’ll keep you posted.
In the meanwhile, here is a 20-minute video on how I process my stacked images.